The old version is still available here
Send and receive real-time video from an iOS application
This guide contains instructions for setting up the Mux Spaces Swift SDK in a UIKit-based iOS app Xcode project. By the end of the guide you'll have a working app that will be able to connect to a Space, as well as send and receive audio and video from the Space's participants.
In this guide:
1
Understand core abstractions
Understand core abstractions
Understand the concepts of working with Mux Real-Time Video.
2
Application setup
Application setup
Set up your iOS application with Xcode and the Spaces SDK with Swift Package Manager.
3
Join a space
Join a space
Join a Mux Space before subscribing to or publishing audio and video.
4
Subscribe to participants
Subscribe to participants
Build a UI to show the current participants.
5
Publish audio and video
Publish audio and video
Publish a local participant's audio and video to a Mux Space.
1Understand core abstractions
Space
A Space is the basic abstraction for creating real-time communications with Mux. In order for clients to authenticate to a space, they need to provide a signed JSON Web Token, or JWT. This signed JWT is the way that the real-time client authenticates to a particular space.
Participant
A participant is an abstraction for a single user connected into a space. A participant can be a subscriber-only, or a publisher who sends one or more streams of audio or video media in the form of a track.
Track
A track is a single stream of media (audio or video). A participant can publish one or more tracks of media.
Creating a space
A Space must be created either through the Mux dashboard or via the Mux API. See the API Reference for creating a Space.API
curl https://api.mux.com/video/v1/spaces \
  -H "Content-Type: application/json" \
  -X POST \
  -u ${MUX_TOKEN_ID}:${MUX_TOKEN_SECRET}
Authenticating into a space
JWTs signing should always be done server-side. Never sign JWTs on the client.
In order to sign the JWT before sending it to your client, you must create a signing key. Signing keys can be managed (created, deleted, listed) either from the Mux dashboard or via the Mux Video API. When creating a new signing key, the API generates a 2048-bit RSA key-pair and returns the private key and the public key. As the name implies, you should securely store the private key, and never pass it to a real-time communications client. The other portion of the key-pair, the public key, will be stored by Mux in order to validate the signed tokens were actually signed by the private key. As it's name suggests, it's perfectly fine to share your public key if you so desire.
See the overview guide for creating a signing key and signing JWTs on your server.
Prerequisites for this example
In order to complete this example you should have the latest Xcode development tools, an Apple Developer account, and at least one hardware device to test on.
Download and open the SDK API documentation in Xcode for easy browsing and reference.
If you are running iOS 16, you'll need to enable developer mode on your device in order to build and run an app from Xcode. Devices running iOS 15 will need to enable the appropriate trust settings in order to build and run an app from Xcode. For more on code-signing see the Apple Support guide here.
2Application setup
Core primitives used in this example:
- Xcode Interface Builder and Storyboard: We're editing a storyboard using interface builder in this example. For more check out this comprehensive Apple WWDC video on working with Interface Builder and Storyboards in Xcode. This retired but still helpful Apple document dicusses important terms like
scenethat are referred to in the guide. We should also mention that storyboards aren't required to use the Spaces SDK in your app! The example app includes a more complex UI section that does not use Storyboards. The title isExample Using Navigation. We are working on a SwiftUI version of this guide as well as an example project, watch this space! - Collection Views: We'll use basic features of
UICollectionViewandUICollectionViewLayoutto display videos from participants in a grid. For more onUICollectionViewcheck out a dedicated series of guides and sample code from Apple. - Collection View Diffable Data Sources: To build a UI driven by real-time updates this guide sets up a diffable data source to consume events from a
Space. Check out this dedicated guide from Apple on workingUICollectionViewandUICollectionViewDiffableDataSource. - Combine: Spaces Swift SDK exposes state updates via an event-based API that uses Combine, an Apple framework for declaratively processing values over time. It'll be particularly helpful to understand Combine publishers work, receiving and handling events in Combine, and how cancellables work to complete this guide. For more about Combine see Apple Combine docs here. Deeper background material about how Combine works see Understanding Combine by Matt Neuburg.
Xcode Setup
As you're going through these steps, we recommend keeping open the SDK API documentation in Xcode to look up more information about the SDK APIs you'll be using.
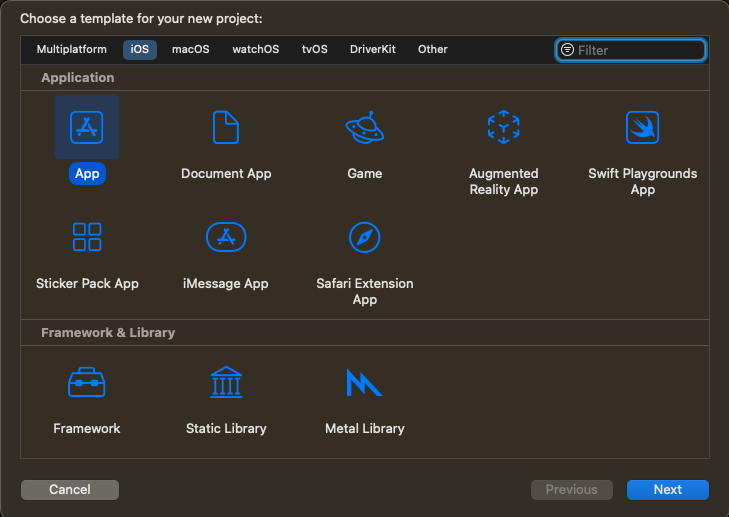
Create a new Xcode project. We'll select the iOS platform and App application template.
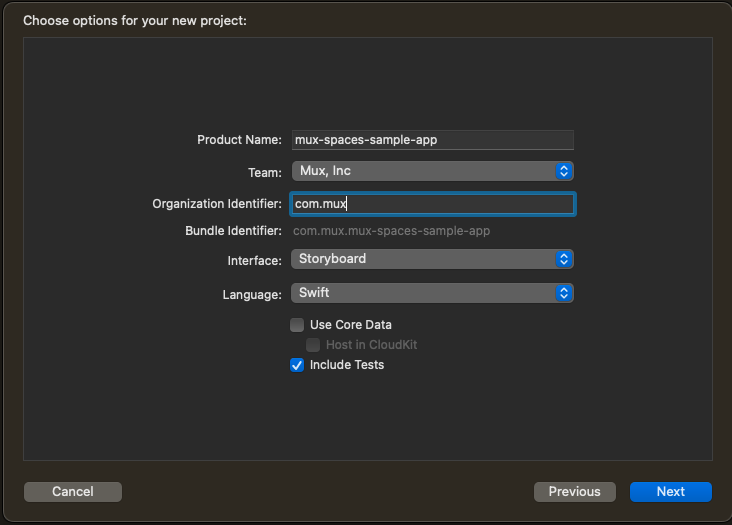
Enter the name of your app, and make sure to select Storyboard as the Interface and Swift as the Language.
Install the SDK
The recommended way to install the MuxSpaces SDK for iOS is via Swift Package Manager
Install the SDK using Swift Package Manager (recommended)
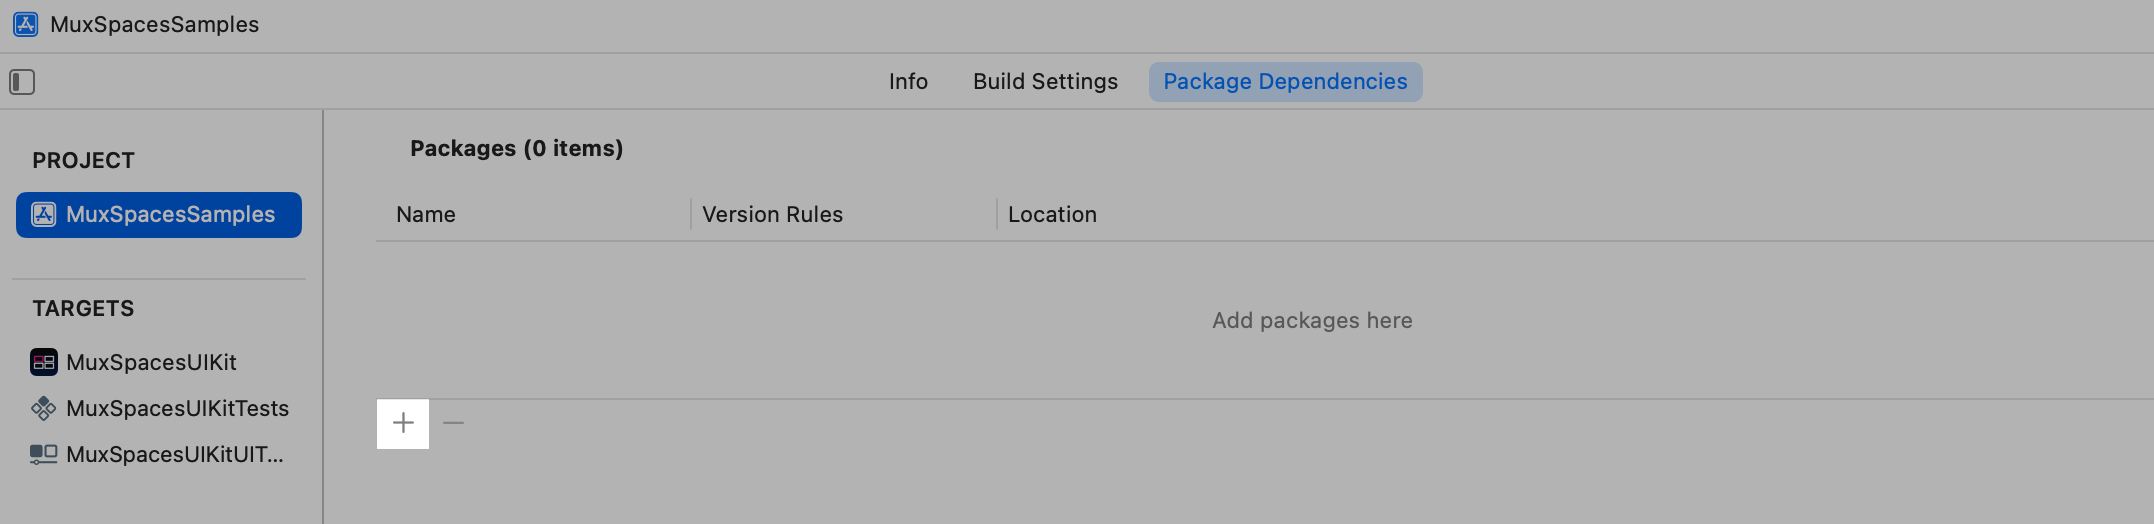
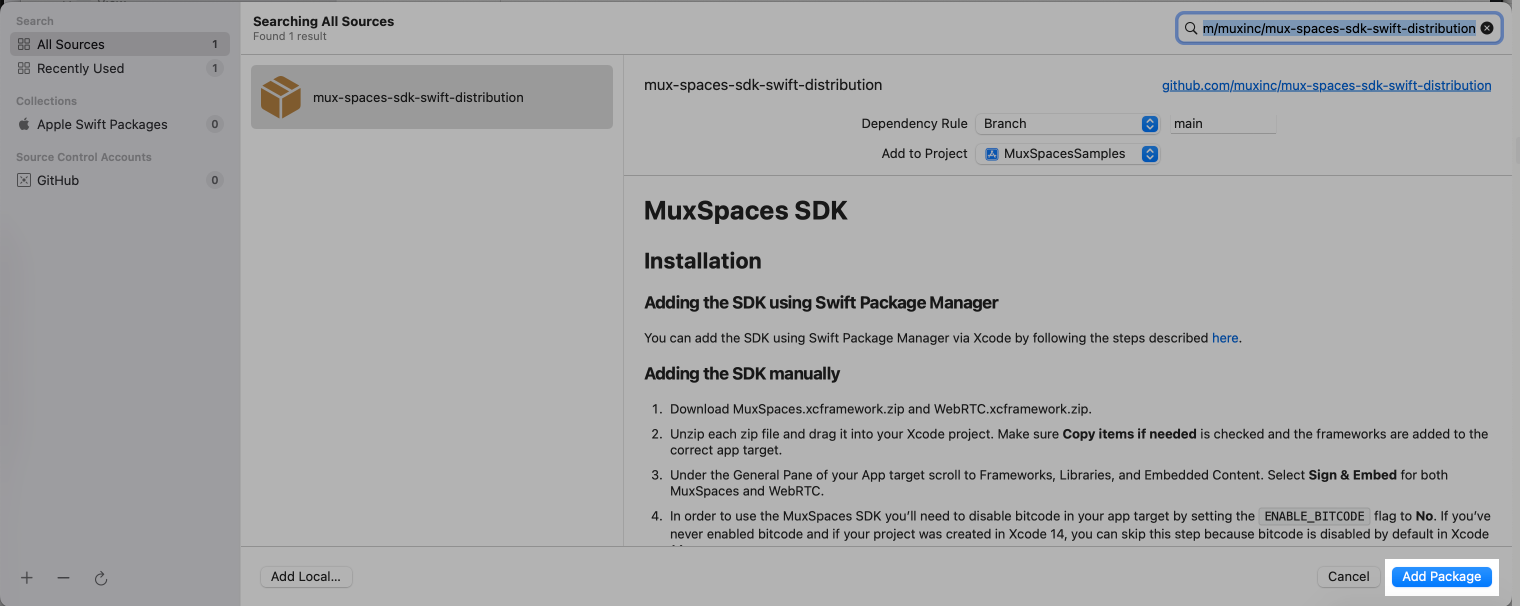
In your project settings select Package Dependencies then click the plus button highlighted below:
This should pop open a search window, enter the URL for the Spaces Swift SDK:
https://github.com/muxinc/mux-spaces-sdk-swift-distribution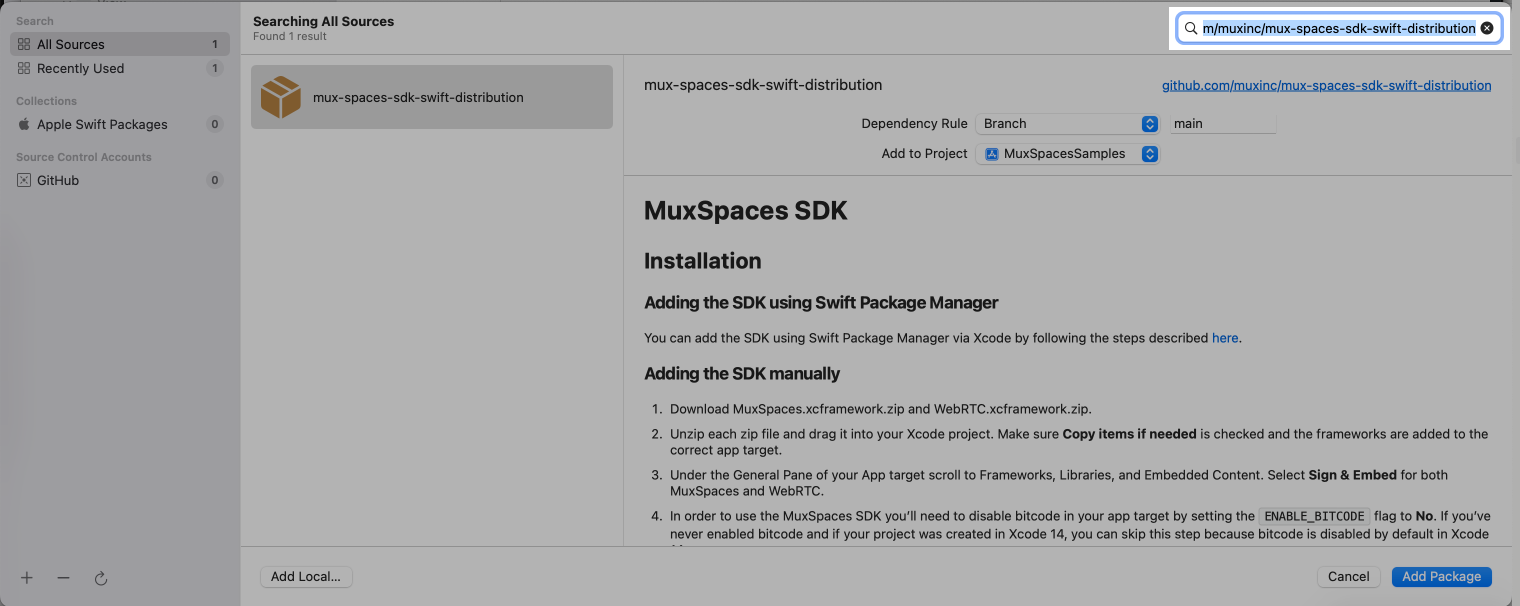
Specify the dependency rule to control what version of the SDK Swift Package Manager will pull down.
To always fetch the latest version of the MuxSpaces SDK leave selected Branch rule in the dropdown menu and the branch name main. If you would rather pin to a specific version you can do that by selecting the Exact Version dependency rule. See Apple's guidelines about deciding on package requirements for a full overview of each type of rule.
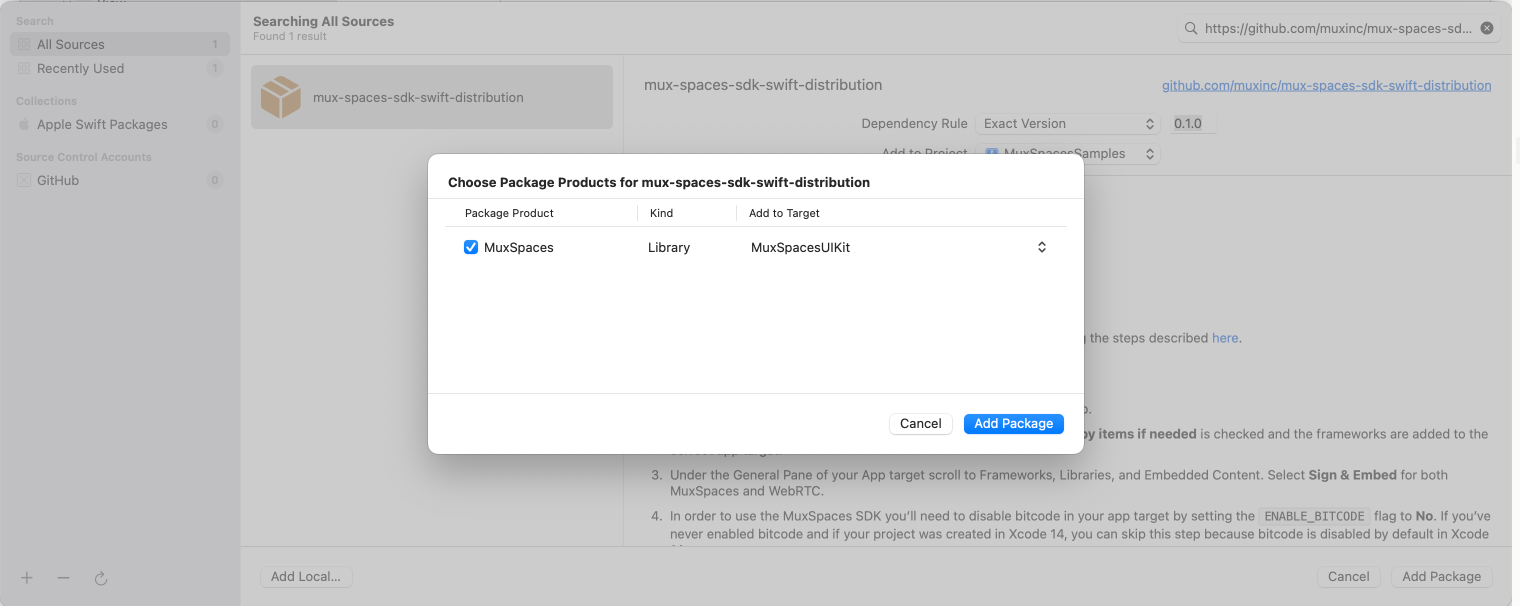
Click on Add Package to begin package download and installation.
Add the MuxSpaces Package Product to the MuxSpacesUIKit app target.
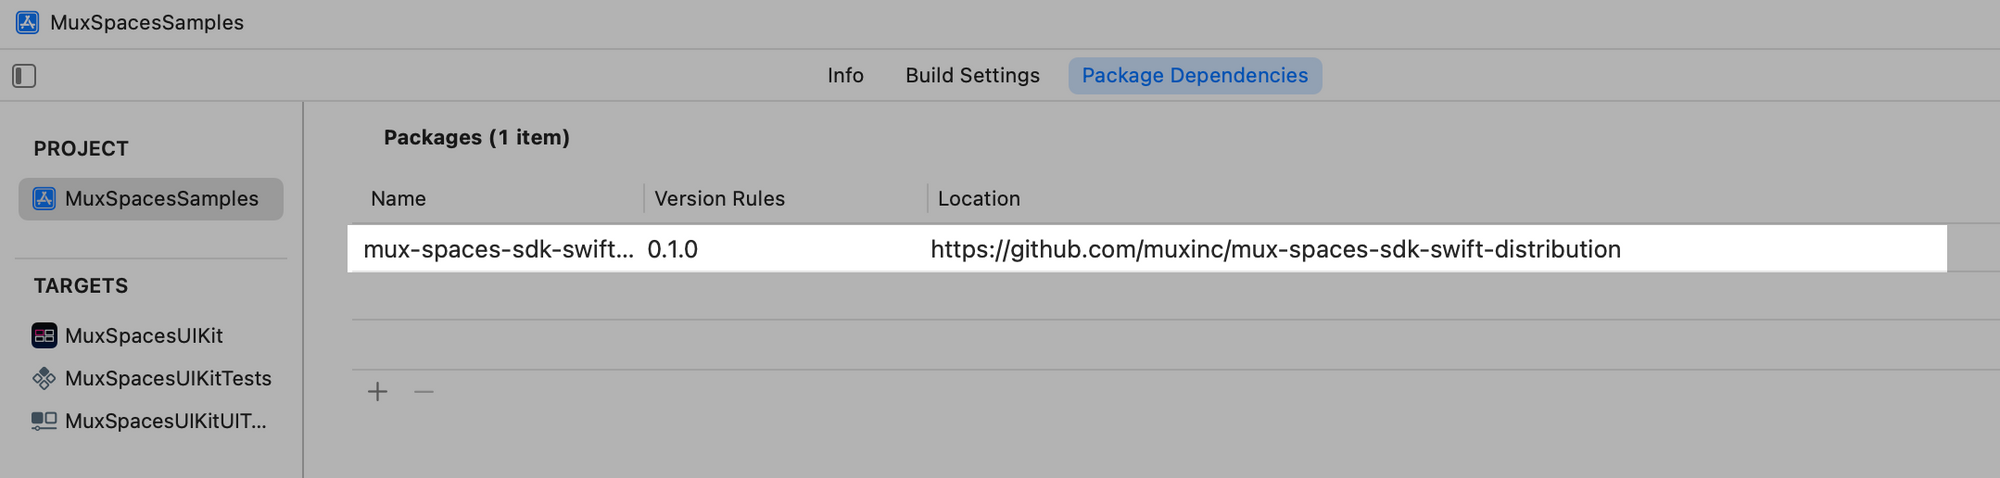
Verify that the MuxSpaces SDK is installed correctly on the list of Package Dependencies in Xcode
Install the SDK manually without using a package manager
If you're not using a Swift Package manager, you can install the MuxSpaces SDK manually in your project as a framework.
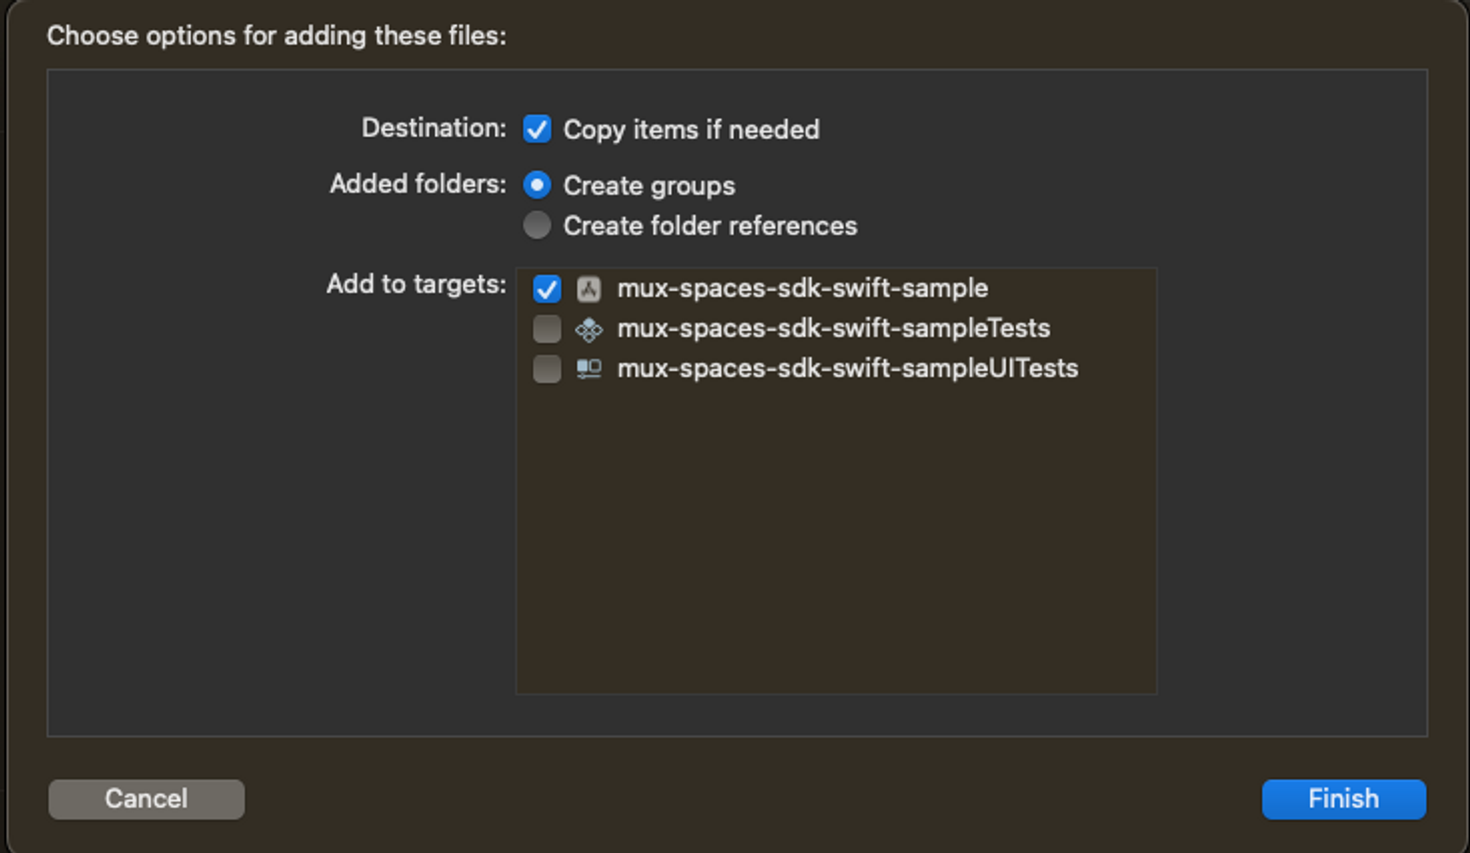
Create a group named Frameworks in Xcode at the root of your project. Download MuxSpaces.xcframework.zip and WebRTC.xcframework.zip from the Assets section of a GitHub release of your desired version. Unzip both archives, then drag each of them into the Frameworks group of the Xcode project. Make sure Copy items if needed is checked and your app target is checked under Add to targets:
Your Project Navigator should now have a Frameworks group with both xcframework inside. Under your target's General > Frameworks, Libraries, and Embedded panel change the Embed option to Embed & Sign for both frameworks.
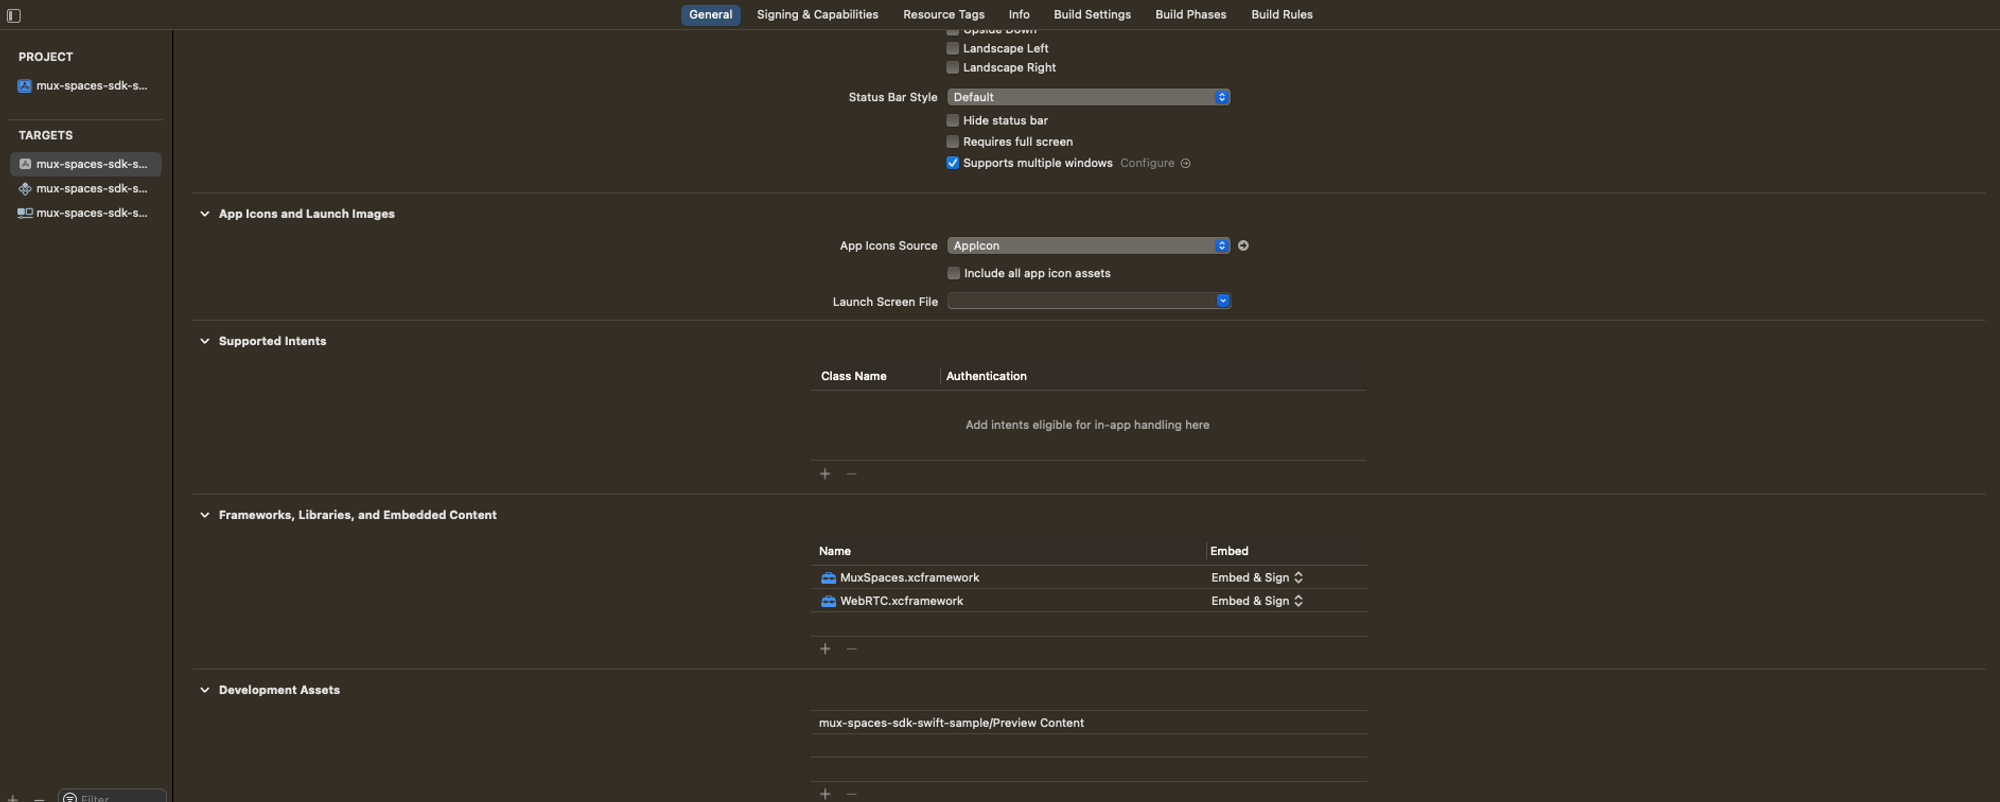
We'll need to disable Bitcode to use MuxSpaces SDK. This minimizes the SDK's impact on your app's binary size. Go to Build Settings under you target and make sure All is selected. Find the Enable Bitcode option and set to No. The Build Settings are searchable using a textfield in the top-right area of the panel.

Double check the setup steps by adding import MuxSpaces to the AppDelegate.swift in your app. Build and run your app on a device. If you have a free Apple Developer account and haven't built and run an app on your device with your account before, you'll need to set the Trust settings on your device to allow installing non-App Store apps.
Configure plist permissions
We're using the MuxSpaces SDK to publish audio and video, so we'll need to configure our app for accessing the on-device camera and microphone.
The app is responsible for supplying a text description for requesting access to the camera and another one for the microphone. Include these descriptions in your app's Info.plist under NSCameraUsageDescription and NSMicrophoneUsageDescription keys respectively.

A missing description will result in the operating system terminating your app. For more details see the Apple documentation on Requesting Authorization for Media Capture on iOS.
3Join a space
How will our app work?
Let's take a moment to think through how our app will work. We'll expand on this description as we build it out.
When the app launches it will display a button that will trigger a call to the SDK to join a space. Once the app joins, it will show either a video or a placeholder view for each participant in the space. To keep things simple we'll arrange the videos and placeholders as a grid.
We'll also publish video from our front camera and audio from the microphone if we join the space successfully and show an error alert if joining the space fails.
Setup reference to a space
Make sure that import MuxSpaces is at the top of your AppDelegate.swift file.
Add two class-level properties to AppDelegate.swift
/// Paste in a token generated in the same way as you did in the
    /// Web SDK Getting Started Guide
    static var token: String = ""

    /// Initialize a Space using the defined token
    static var space: Space = {

        precondition(
            !token.isEmpty,
            "Please set a valid JWT token before initializing a space"
        )

        return try! Space(token: token)
    }()
Create a view controller for displaying the app user interface
Next we'll create a blank screen with a button to join our space when tapped. Create a new file named SpaceViewController.swift with the following snippet:
import Combine
import UIKit
import MuxSpaces
class SpaceViewController: UIViewController {
// MARK: IBOutlets for Storyboard
@IBOutlet var participantsView: UICollectionView!
@IBOutlet var joinSpaceButton: UIButton!
// MARK: IBAction for Storyboard
@IBAction @objc func joinSpaceButtonDidTouchUpInside(
_ sender: UIButton
) {
guard joinSpaceButton == sender else {
print("Unexpected sender received by join space handler. This should be the join space UIButton.")
return
}
joinSpaceButton.isEnabled = false
}
// MARK: Subscription related state
var cancellables: Set<AnyCancellable> = []
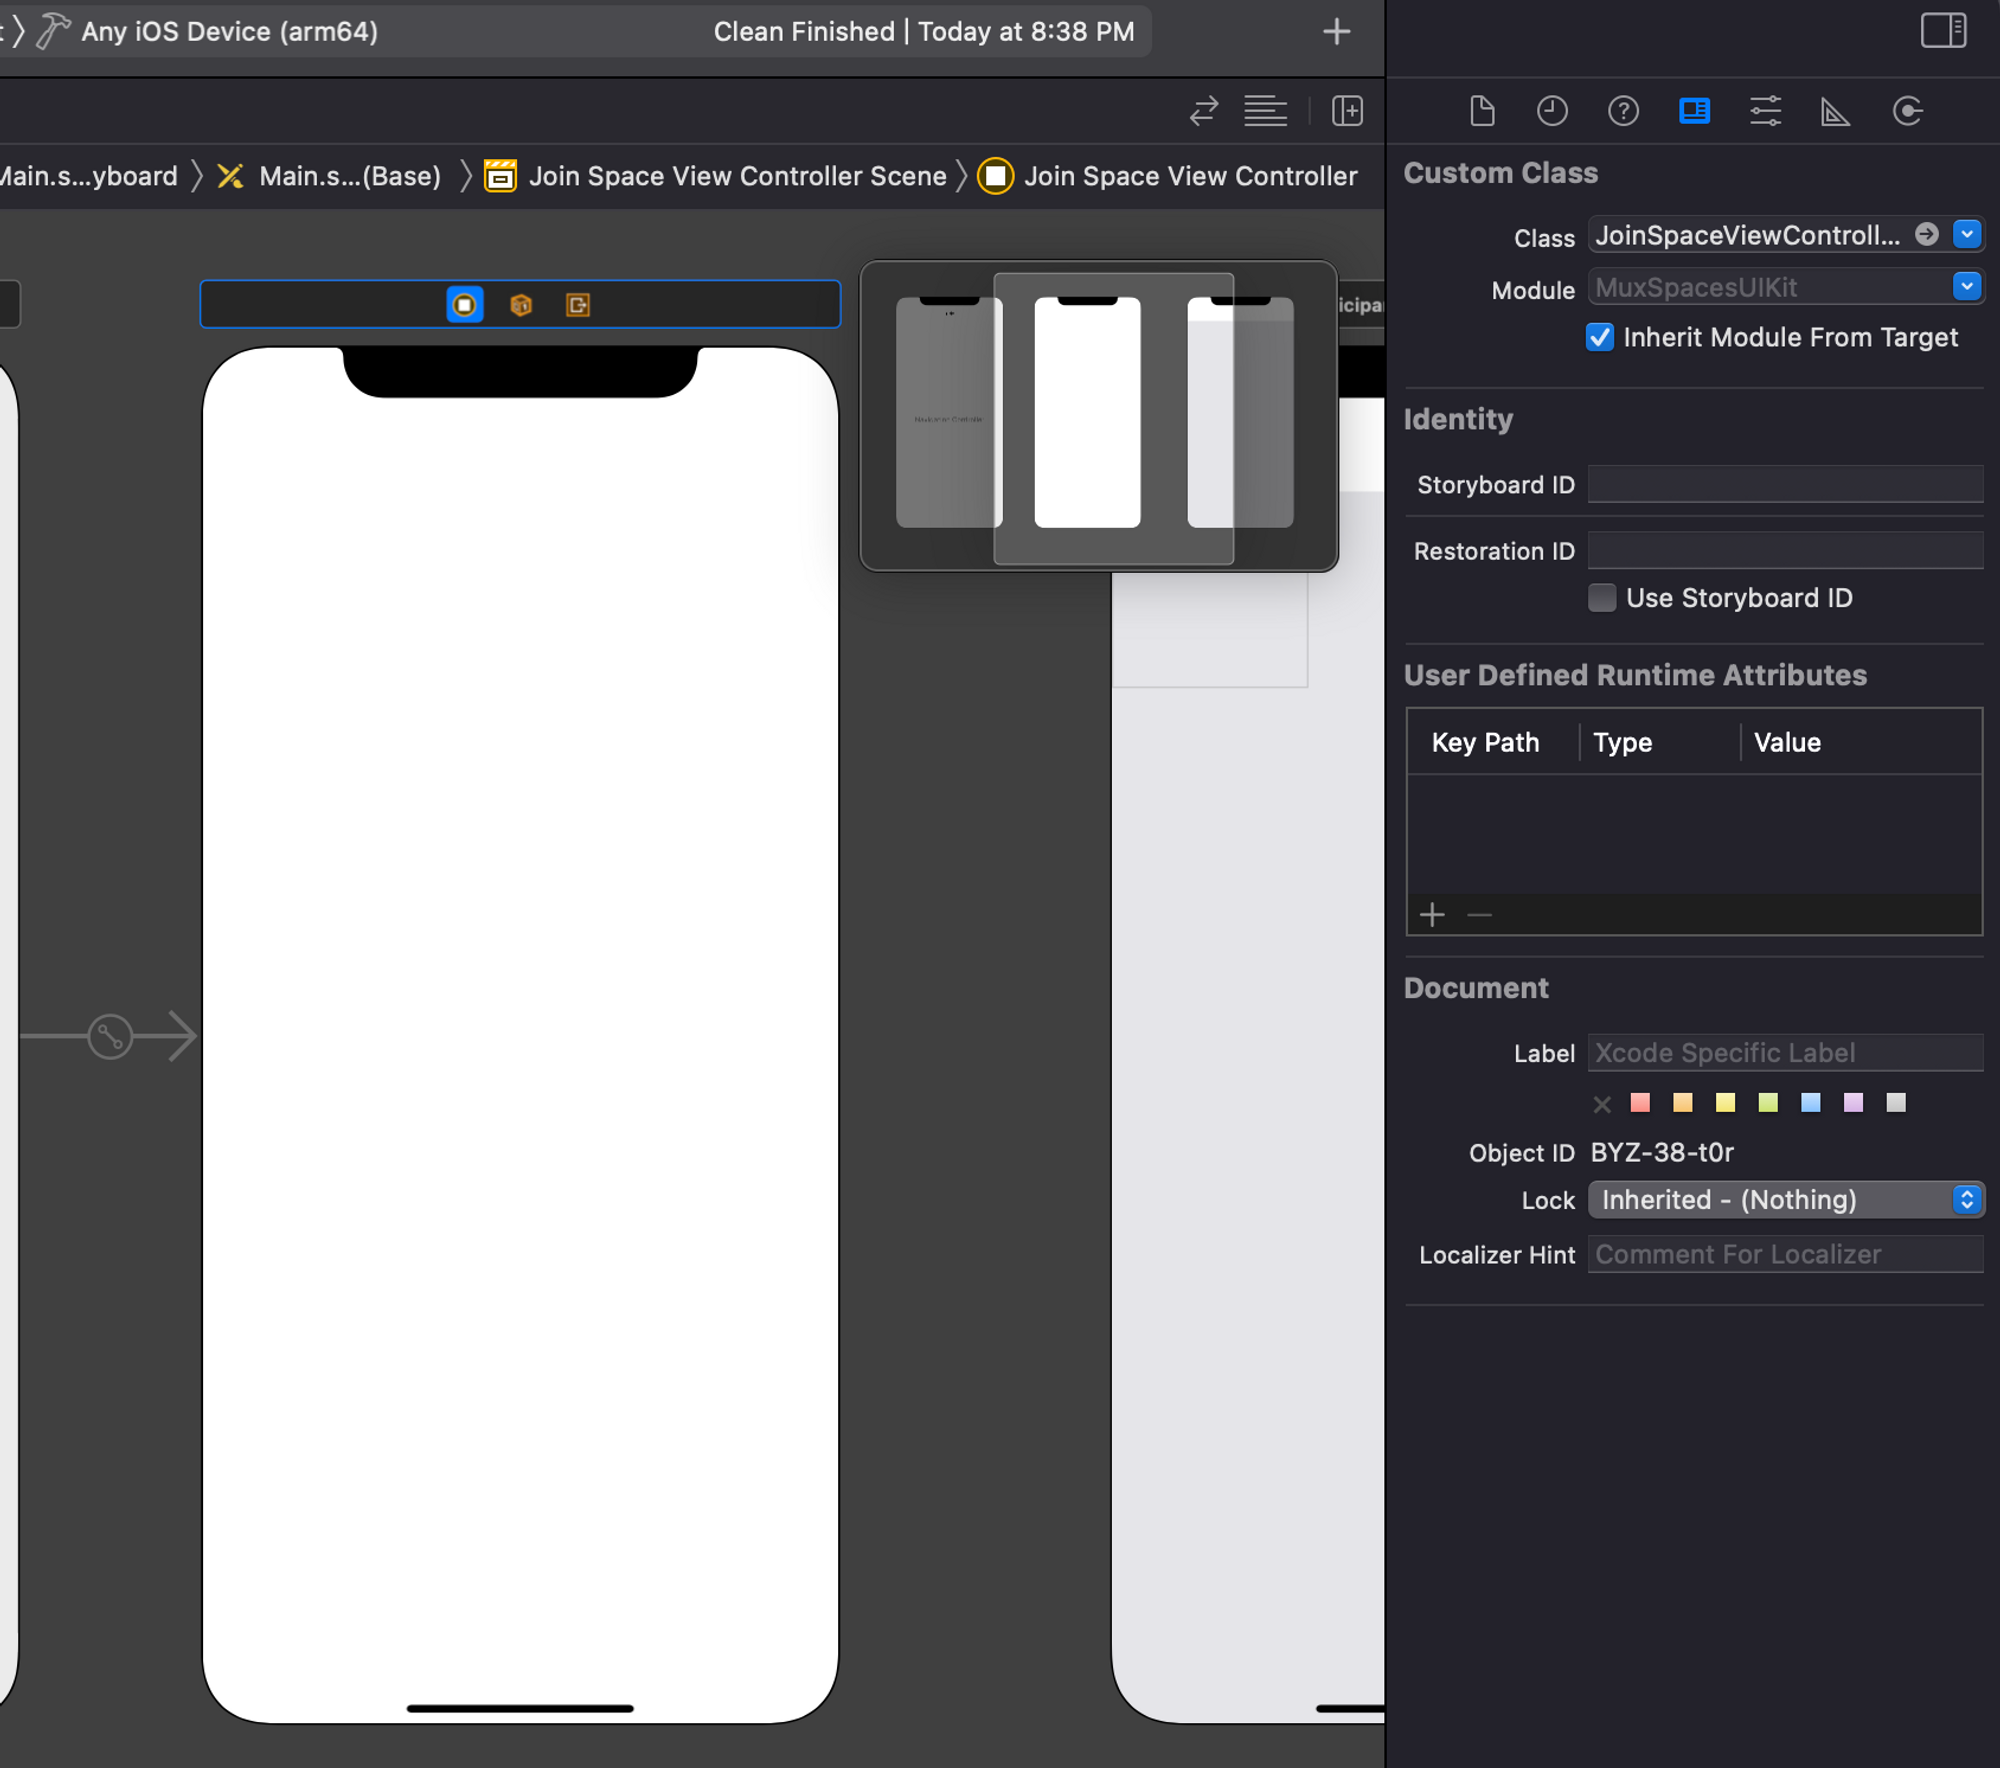
}Let's also add SpaceViewController to Main.storyboard and lay out a button to trigger joining a space. The storyboard file is pre-seeded with a single scene, click on the scene and select the Custom Class tab on the Identity Inspector control panel on the right side of the Xcode window. Enter SpaceViewController as the Class. Make sure Inherit Module From Target check box is checked and the textfield right above it matches the name of your app target.
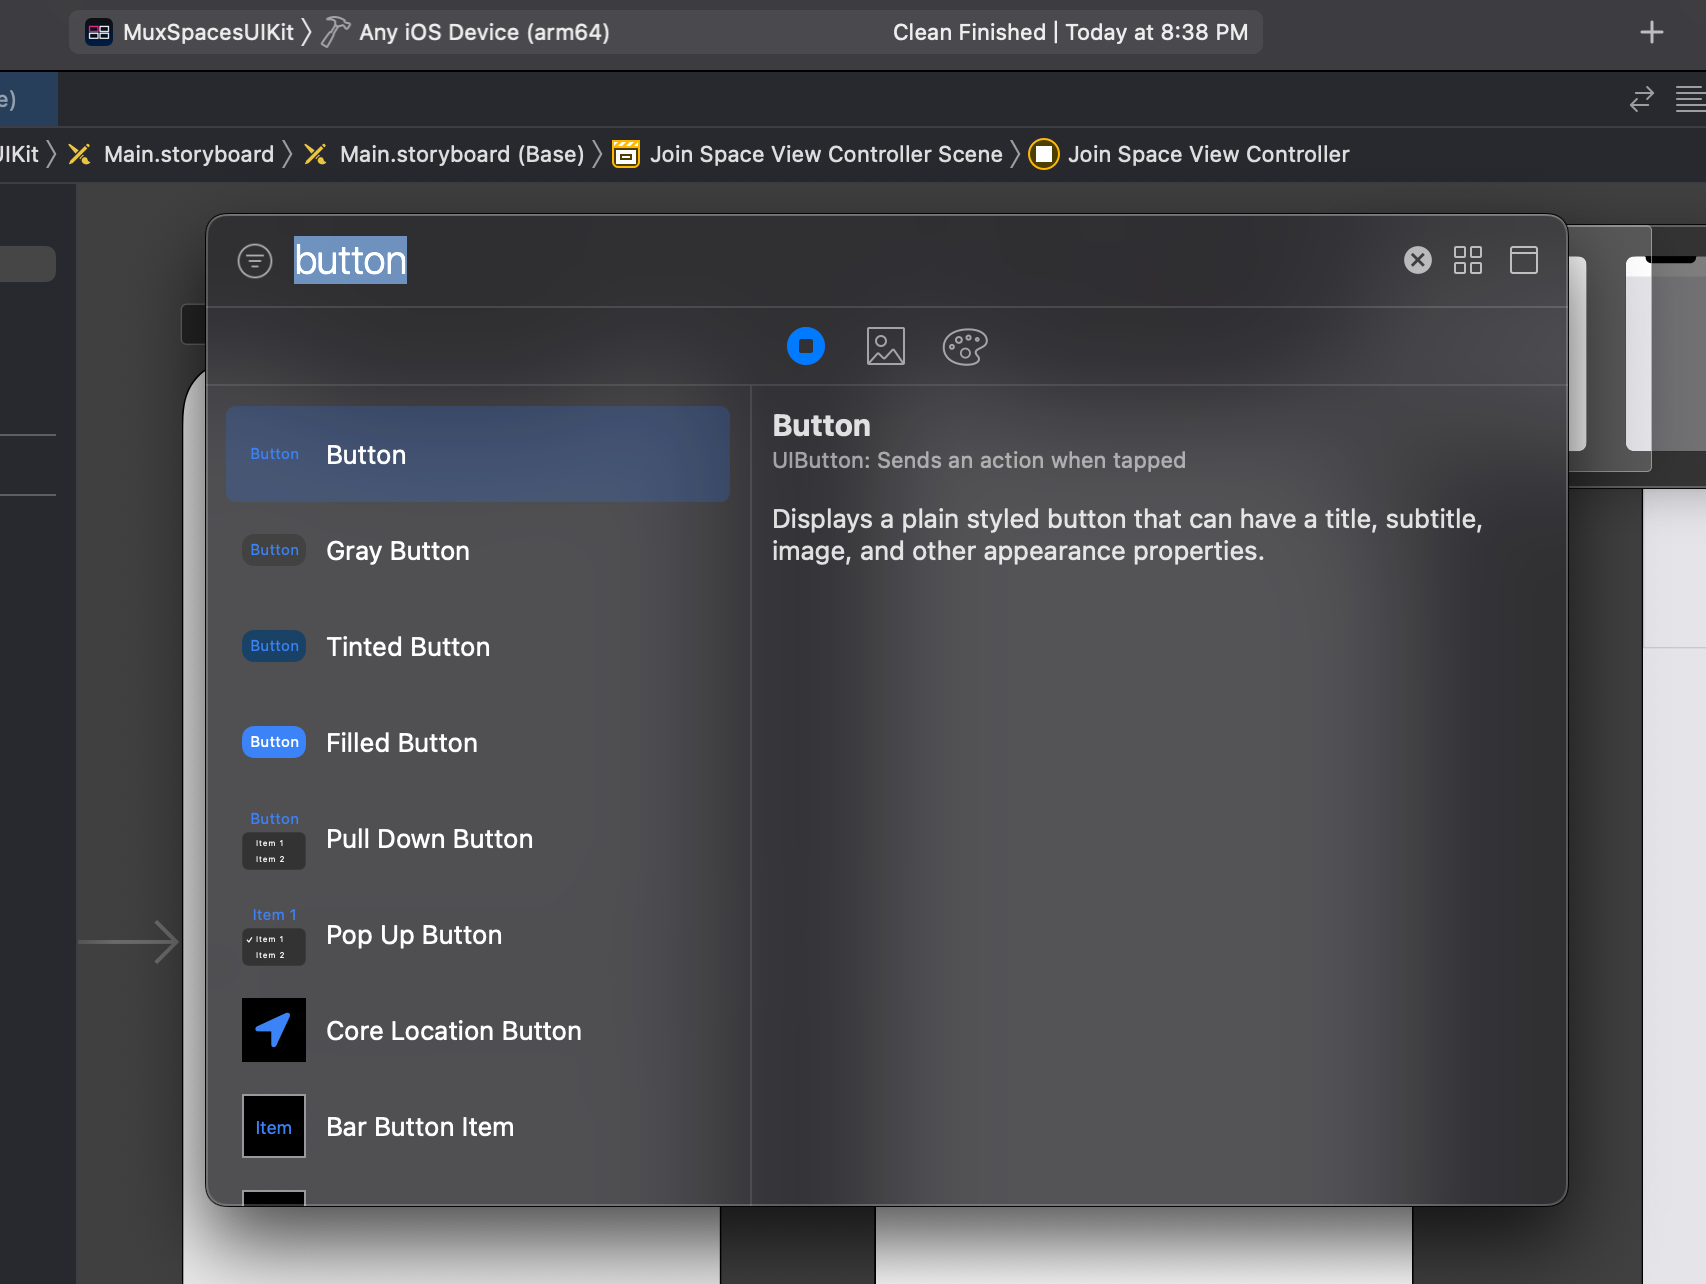
Next let's add the "Join Space" button. Click the plus (+) button near the top-right area of the Xcode window to get access to the Object Library, select the Button element, and drag it to the center of the SpaceViewController scene.
Select the button you've just dragged and connect it to the SpaceViewController joinSpaceButtonDidTouchUpInside outlet by dragging and simultaneously pressing the ctrl button to the SpaceViewController reference in the Storyboard navigation bar on the left side of the window. Repeat this step with the joinSpaceButton variable.
Then, select the touchUpInside action. Set the button title by double clicking the button to make it editable. Feel free to tweak other styling in the Attributes Inspector. Your Join Space View Controller should now look similar to this:
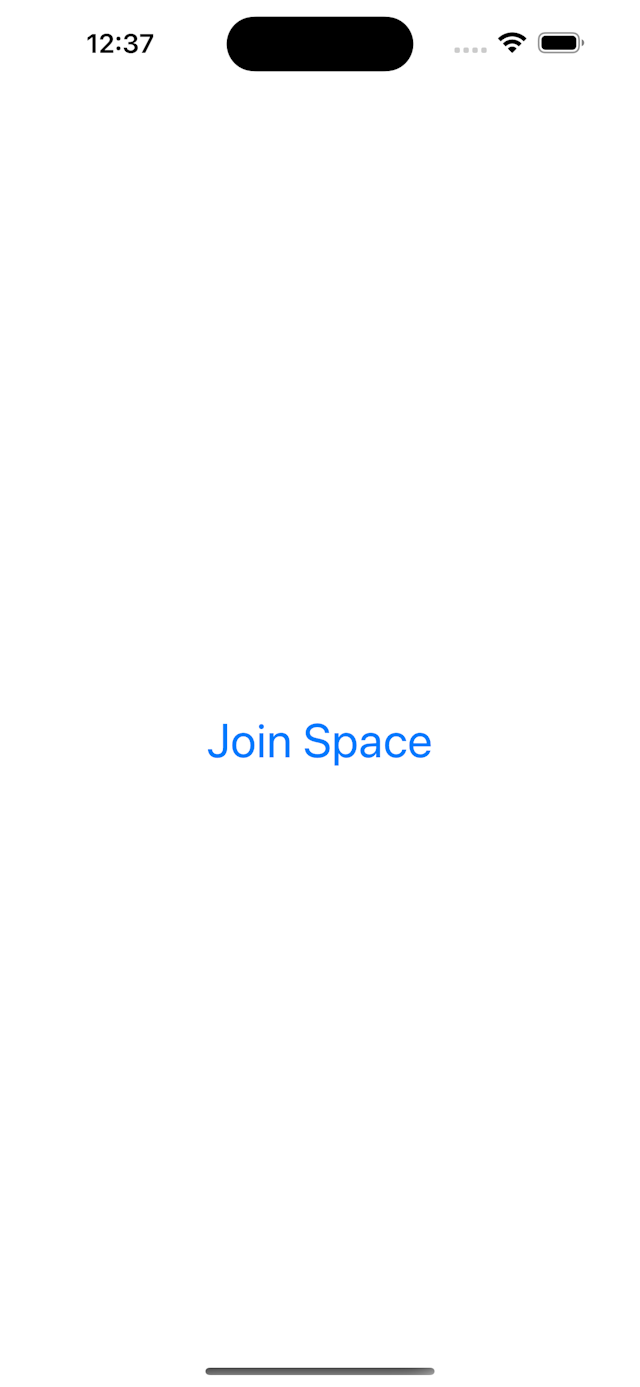
In the next section the app will join the space when the button is tapped.
Trigger button to call to join a Space
We'll put this method inside of an extension on SpaceViewController. Add this to the bottom of SpaceViewController.swift, below the closing curly brace of the previous snippet.
// MARK: - Trigger button to call to join Space

extension SpaceViewController {
    func joinSpace() {
        // Setup event handlers for joining the space
        // successfully

        // When the space is successfully joined,
        // hide the join space button
        AppDelegate.space
            .events
            .joinSuccess
            .map { _ in return true }
            .assign(
                to: \.isHidden,
                on: joinSpaceButton
            )
            .store(in: &cancellables)

        // When the space is successfully joined,
        // unhide the participants view
        AppDelegate.space
            .events
            .joinSuccess
            .map { _ in return false }
            .assign(
                to: \.isHidden,
                on: participantsView
            )
            .store(in: &cancellables)

        AppDelegate.space.join()
    }
}
Add joinSpace() to the bottom of joinSpaceButtonDidTouchUpInside.
Add a collection view in the storyboard scene
Let's now add a collection view for displaying the participants. Click the plus (+) button near the top-right area of the Xcode window to open the object library and select collection view. Add the collection view to the SpaceViewController scene. Feel free to customize it's layout constraints or appearance. Connect the participantsView outlet to the collection view.
Try out Joining your Space
Build and run your project. If the token was configured correctly, the Join Space button should disappear once the app joins the space. Next you'll display the current participants in the space.
4Subscribe to participants
Add ParticipantsSnapshot to keep track of space state
In this section we'll display a cell for each participant currently in the space in the participantsView. The cell will display a placeholder black screen for participants with no video. The local participant cell will be a placeholder too because the app isn't yet publishing video. Publishing video will be added in the next section.
Before we get started, let's think about a good mechanism to propagate updates from Space to the participantsView. We'll use UICollectionViewDiffableDataSource as a backing data source for participantsView. It uses NSDiffableDataSourceSnapshot to represent the state of each cell.
To convert an event sent by Space into NSDiffableDataSourceSnapshot we'll add some helper methods first. Create a new file ParticipantsSnapshot.swift and paste in the snippet below.
import UIKit

import MuxSpaces

// MARK: - Section

/// The UI we're building will only display participants and
/// their videos so there is only one section defined here
enum Section: Int {
    case participants
}

// MARK: - Typealiases

/// To help readibility, we'll use a typealias to refer to
/// the data source
typealias ParticipantsDataSource = UICollectionViewDiffableDataSource<
    Section,
        String
>

/// We'll also use a typealias to refer to the snapshot
typealias ParticipantsSnapshot = NSDiffableDataSourceSnapshot<
    Section,
        String
>

extension ParticipantsSnapshot {

    /// Creates a snapshot with an empty participants section
    static func makeEmpty() -> ParticipantsSnapshot {
        var snapshot = ParticipantsSnapshot()

        snapshot.appendSections(
            [.participants]
        )

        return snapshot
    }

    // MARK: Update or Insert Participant

    /// Updates an existing cell by removing or adding a UIView
    /// displaying the participants video.
    ///
    /// If no cell corresponding to the participant is found
    /// then adds participant along with their video if applicable.
    ///
    mutating func upsertParticipant(
        _ participantID: Participant.ID
    ) {
        let items = itemIdentifiers
            .filter { (checkedItem: Participant.ID) in
                return checkedItem == participantID
            }

        if items.isEmpty {
            self.appendItems(
                [
                    participantID
                ],
                toSection: .participants
            )
        } else {
            self.reloadItems(
                [
                    participantID
                ]
            )
        }
    }

    // MARK: Remove Participant

    /// Removes a participant from the snapshot and
    /// causes the collection view to delete the cell
    /// that corresponds to that participant's video
    mutating func removeParticipant(
        _ participantID: Participant.ID
    ) {
        let deletedItems = itemIdentifiers
            .filter {
                return $0 == participantID
            }

        deleteItems(deletedItems)
    }
}
We'll define only one section in which to place the participants. A participant ID will be used to represent a single participant cell. The ID of the participant works well as an identifier since it is both unique and also stable across time. Use makeEmpty in the above snippet to create a snapshot with no participants as an initial value.
Create a collection view cell to display video
Each item in a snapshot will be used by the collection view to render a cell. Let's make that next. Create a new file SpaceParticipantVideoCell.swift and paste in the following snippet:
import UIKit

import MuxSpaces

class SpaceParticipantVideoCell: UICollectionViewCell {
    // SpacesVideoView gets recycled with collection view cells.
    lazy var videoView = SpacesVideoView()
    lazy var placeholderView = UILabel()
    // Display a placeholder view if no video track
    var showsPlaceholder: Bool {
        videoView.track == nil
    }

    override func prepareForReuse() {
        super.prepareForReuse()
        // clear participant data when
        // collection view cell is reused
        placeholderView.text = ""
        // clear the video view track when
        // collection view cell is reused
        videoView.track = nil
    }

    func setupPlaceholderViewIfNeeded() {
        if !contentView.subviews.contains(
            placeholderView
        ) {
            placeholderView.textColor = .white

            placeholderView
                .translatesAutoresizingMaskIntoConstraints = false
            contentView.addSubview(
                placeholderView
            )
            addConstraints([
                placeholderView.centerXAnchor.constraint(
                    equalTo: contentView.centerXAnchor
                ),
                placeholderView.centerYAnchor.constraint(
                    equalTo: contentView.centerYAnchor
                ),
            ])
            placeholderView.backgroundColor = .black
        }
    }

    func setupVideoViewIfNeeded() {
        if !contentView.subviews.contains(videoView) {
            videoView.translatesAutoresizingMaskIntoConstraints = false
            videoView.clipsToBounds = true
            videoView.layer.cornerRadius = 8.0

            contentView.insertSubview(
                videoView,
                belowSubview: placeholderView
            )
            addConstraints([
                videoView.centerXAnchor.constraint(
                    equalTo: contentView.centerXAnchor
                ),
                videoView.centerYAnchor.constraint(
                    equalTo: contentView.centerYAnchor
                ),
                videoView.widthAnchor.constraint(
                    equalTo: contentView.widthAnchor
                ),
                videoView.heightAnchor.constraint(
                    equalTo: contentView.heightAnchor
                ),
            ])

            videoView.translatesAutoresizingMaskIntoConstraints = false
        }
    }

    func setup() {
        backgroundView?.layer.cornerRadius = 8.0
        contentView.layer.cornerRadius = 8.0
        contentView.clipsToBounds = true
        contentView.backgroundColor = .black

        setupPlaceholderViewIfNeeded()

        setupVideoViewIfNeeded()
    }

    func update(
        participantID: String,
        videoTrack: VideoTrack? = nil
    ) {
        videoView.track = videoTrack
        setup() // Add this!

        if showsPlaceholder {
            /// Show black background with participant ID
            /// displayed inside a centered label
            placeholderView.text = participantID
            contentView.bringSubviewToFront(placeholderView)
            contentView.sendSubviewToBack(videoView)
        } else {
            /// Show SpacesVideoView
            placeholderView.text = ""
            contentView.bringSubviewToFront(videoView)
            contentView.sendSubviewToBack(placeholderView)
        }
    }
}
We recommend limiting the instances of SpaceVideoView used in your app. In this example each cell will use it's own dedicated SpaceVideoView. This relies on cell recycling performed by UICollectionView.
When the cell is configured with a new video track, we can simply swap in the new track like so: videoView.track = videoTrack. Inside the UIKit prepareForReuse callback, call videoView.track = nil to prevent reappearance of the previous track when the cell is recycled.
Implement view model
A common design pattern used in iOS development for translating abstract state changes to UI changes is a view model. In our case the absract state changes are Space.Event we receive. We'll implement our own view model next and use the space events we receive to mutate the participant snapshot and update the parts of participantsView that have changed.
If you're using Spaces inside of a SwiftUI project, a similar approach using ObservableObject can work well!
Create a new file named SpaceViewModel.swift and add the snippet below.
import Combine
import UIKit

import MuxSpaces

// MARK: - Space View Model

class SpaceViewModel {
    /// For more about the @Published property wrapper
    /// see [here](https://developer.apple.com/documentation/combine/published)

    // MARK: Join Button
    @Published var isJoinSpaceButtonHidden: Bool = false

    // MARK: Participants Snapshot
    @Published var snapshot: ParticipantsSnapshot

    // MARK: Participants View
    @Published var isParticipantsViewHidden: Bool = true

    // MARK: Display Error
    @Published var shouldDisplayError: Error? = nil

    // MARK: Space
    /// The space the app is joining
    var space: Space

    // MARK: Published Tracks
    /// If the app publishes audio or video tracks,
    /// they will be set here
    var publishedAudioTrack: AudioTrack?
    var publishedVideoTrack: VideoTrack?

    // MARK: Initialization
    init(space: Space) {
        self.space = space
        self.snapshot = ParticipantsSnapshot.makeEmpty()
    }

    // MARK: Setup Snapshot Updates
    func setupSnapshotUpdates(
        for dataSource: ParticipantsDataSource
    ) -> AnyCancellable {
        return $snapshot
            .sink { dataSource.apply($0) }
    }

    // MARK: Fetch Most Recent Participant State
    func participant(
        from participantID: Participant.ID
    ) -> Participant? {
        if let localParticipant = space.localParticipant {
            return (
                [localParticipant] + space.remoteParticipants
            ).filter { $0.id == participantID }.first
        } else {
            return space.remoteParticipants
                .filter { $0.id == participantID }.first
        }
    }

    // MARK: Update Participant Cell
    func configureSpaceParticipantVideo(
        _ cell: SpaceParticipantVideoCell,
        indexPath: IndexPath,
        participantID: Participant.ID
    ) {
        guard let participant = participant(
            from: participantID
        ) else {
            print("No Participant!")
            return
        }

        cell.update(
            participantID: participant.id,
            videoTrack: participant.videoTracks.values.first
        )
    }

}

extension SpaceViewModel {
    var audioCaptureOptions: MuxSpaces.AudioCaptureOptions? {
        return AudioCaptureOptions()
    }

    var cameraCaptureOptions: MuxSpaces.CameraCaptureOptions? {
        return CameraCaptureOptions()
    }

    // MARK: - Setup Observers on Space State Updates

    func setupEventHandlers() -> Set<AnyCancellable> {

        var cancellables: Set<AnyCancellable> = []

        /// Setup observers that will update your views state
        /// based on events that are produced by the space
        space
            .events
            .joinSuccess.map { _ in return false }
            .assign(to: \.isParticipantsViewHidden, on: self)
            .store(in: &cancellables)

        space
            .events
            .joinSuccess.map { _ in return true }
            .assign(to: \.isJoinSpaceButtonHidden, on: self)
            .store(in: &cancellables)

        space
            .events
            .joinFailure
            .map { _ in return nil }
            .assign(to: \.shouldDisplayError, on: self)
            .store(in: &cancellables)

        space
            .events
            .joinSuccess
            .sink { [weak self] _ in
                guard let self = self else {
                    return
                }

                self.handleJoinSuccess()
            }
            .store(in: &cancellables)

        Combine.Publishers.Merge6(
            /// Joining a space successfully triggers a
            /// placeholder cell to be added for the local participant
            space.events
                .joinSuccess
                .map(\.localParticipant.id),
            /// Participant joined events trigger a new
            /// cell to be added for each new participant
            space.events
                .participantJoined
                .map(\.participant.id),
            /// When the SDK subscribes to a new video track,
            /// the participants video becomes available to display
            space.events
                .videoTrackSubscribed
                .map(\.participant.id),
            /// When the SDK unsubscribes from a video track,
            /// the participants video should be taken down
            /// this update is handled in ParticipantsViewModel
            space.events
                .videoTrackUnsubscribed
                .map(\.participant.id),
            // We only want to know when our own tracks are
            // published
            space.events
                .videoTrackPublished
                .filter { $0.participant.isLocal }
                .map(\.participant.id),
            // We only want to know when our own tracks are
            // published
            space.events
                .videoTrackUnpublished
                .filter { $0.participant.isLocal }
                .map(\.participant.id)
        )
        .sink(receiveValue: { [weak self] (id: Participant.ID) in
            guard let self = self else { return }

            self.upsertParticipant(
                id
            )
        })
        .store(in: &cancellables)

        /// Each participant leaving will cause the applicable cell
        /// to be removed.
        space.events
            .participantLeft
            .map(\.participant.id)
            .sink(receiveValue: { [weak self] (id: Participant.ID) in
                guard let self = self else { return }

                self.removeParticipant(
                    id
                )
            })
            .store(in: &cancellables)

        return cancellables
    }

    func joinSpace() -> Set<AnyCancellable> {
        let cancellables = setupEventHandlers()

        space.join()

        return cancellables
    }

    func handleJoinSuccess() {
        #if !targetEnvironment(simulator)
        publishAudio()
        publishVideo()
        #endif
    }

    func publishAudio() {
        // Unimplemented for now
    }

    func publishVideo() {
        // Unimplemented for now
    }

    func upsertParticipant(
        _ participantID: Participant.ID
    ) {
        self.snapshot.upsertParticipant(
            participantID
        )
    }

    func removeParticipant(
        _ participantID: Participant.ID
    ) {
        self.snapshot.removeParticipant(
            participantID
        )
    }

    func resetSnapshot() {
        self.snapshot = ParticipantsSnapshot.makeEmpty()
    }
}
We'll now trigger the appropriate changes to our UI inside SpaceViewModel. SpaceViewController will call configureSpaceParticipantVideo(_:indexPath:participantID:) each time it needs to re-draw a cell and provides it the cell and the participant ID associated with that cell. SpaceViewModel takes care of the rest.
class SpaceViewController {

    // See Create SpaceViewController.swift above

    // MARK: View Model
    lazy var viewModel = SpaceViewModel(
        space: AppDelegate.space
    )

    // MARK: View Lifecycle
    override func viewDidLoad() {
        super.viewDidLoad()
        /// Setup participants view with a custom layout and
        /// configure its backing data source
        setupParticipantsView()
    }

    override func viewWillDisappear(_ animated: Bool) {
        /// Tear down
        cancellables.forEach { $0.cancel() }
        super.viewWillDisappear(animated)
    }

    // MARK: UI Setup
    lazy var dataSource: ParticipantsDataSource = setupParticipantsDataSource()

    func setupParticipantsDataSource() -> ParticipantsDataSource {
        let participantVideoCellRegistration = UICollectionView
            .CellRegistration<
                SpaceParticipantVideoCell,
                    Participant.ID
        >(
            handler: viewModel.configureSpaceParticipantVideo(_:indexPath:participantID:)
        )

        let dataSource = ParticipantsDataSource(
            collectionView: participantsView
        ) { (collectionView: UICollectionView, indexPath: IndexPath, item: Participant.ID) -> UICollectionViewCell? in
            return collectionView.dequeueConfiguredReusableCell(
                using: participantVideoCellRegistration,
                for: indexPath,
                item: item
            )
        }

        participantsView.dataSource = dataSource

        viewModel
            .setupSnapshotUpdates(for: dataSource)
            .store(in: &cancellables)

        return dataSource
    }

    func setupParticipantsView() {
        participantsView.isHidden = true
        self.dataSource = setupParticipantsDataSource()
    }
}
Update the UI based on events received from a space
Replace the joinSpace method inside SpaceViewController.swift with the following snippet:
func joinSpace() {
    // Setup an event handler for joining the space
    // successfully
    viewModel.$isParticipantsViewHidden
        .assign(
            to: \.isHidden,
            on: participantsView
        )
        .store(in: &cancellables)

    viewModel.$isJoinSpaceButtonHidden
        .assign(
            to: \.isHidden,
            on: joinSpaceButton
        )
        .store(in: &cancellables)

    // Setup an event handler in case there is an error
    // when joining the space
    viewModel.$shouldDisplayError
        .compactMap { $0 }
        .sink { [weak self] joinError in

            guard let self = self else { return }

            // Handle join space error here
        }
        .store(in: &cancellables)

    // We're all setup, lets join the space!
    let dataSourceCancellables = viewModel.joinSpace()

    cancellables.formUnion(dataSourceCancellables)
}
Right before joining a space, SpaceViewController subscribes to receive updates from its view model publishable properties. The values of these properties are driven by events the view model gets from the space. The view model subscribes to events via the events property exposed by space. Your app can access specific streams of events, such as joinSuccess or participantJoined.
/// A publisher whose stream only includes events triggered by a remote participant
/// joining the space
let participantJoinedPublisher = space.events.participantJoined
Subscribing to a publisher of a specific type of event makes it easy to drive specific UI interactions or selectively update your app's UI based on the event. Note: space.events.all emits all space events in a single stream, in case you'd prefer to handle all the events in one place.
Setup listeners for events emitted by the space that should be reflected by UI updates. As an example, the call below will trigger upsertParticipant which will either setup a new cell or update an existing one in the collection view.
space.events
        .participantJoined
        .map(\.participant.id)
The view model in the code snippet above handles events triggered by a participant leaving, track subscriptions, and track unsubscriptions similarly. These are just a few of the events available! To see what other events are available, take a look at the Space.Event inline documentation. The SDK package you received includes MuxSpaces.doccarchive. You can open this file using Xcode and browse the full SDK API.
SpaceViewModel is also used to configure each collection view cell based on the corresponding participant and video track.
Add layout
Let's now configure our layout that sizes cells to fit a 16:9 aspect ratio. Create a file named ParticipantLayout.swift and add in snippet below:
import AVFoundation
import UIKit

class ParticipantLayout: UICollectionViewCompositionalLayout {

    static func make() -> UICollectionViewCompositionalLayout {
        return UICollectionViewCompositionalLayout { (sectionIdentifier: Int, env: NSCollectionLayoutEnvironment) in

            switch sectionIdentifier {
            case Section.participants.rawValue:
                /// Total size our collection view has to work with
                let contentSize = env.container.effectiveContentSize

                /// Split into content area into quarters
                let contentSizeSplitIntoQuarters = contentSize.applying(
                    CGAffineTransform(
                        scaleX: 0.5,
                        y: 0.5
                    )
                )

                let aspectRatio = CGSize(
                    width: 16,
                    height: 9
                )

                let rectRespectingAspectRatio = AVMakeRect(
                    aspectRatio: aspectRatio,
                    insideRect: CGRect(
                        origin: .zero,
                        size: contentSizeSplitIntoQuarters
                    ).inset(
                        by: UIEdgeInsets(
                            top: 5, left: 5, bottom: 5, right: 5
                        )
                    )
                )

                let itemSize = NSCollectionLayoutSize(
                    widthDimension: .absolute(
                        rectRespectingAspectRatio.width
                    ),
                    heightDimension: .absolute(
                        rectRespectingAspectRatio.height
                    )
                )
                let item = NSCollectionLayoutItem(
                    layoutSize: itemSize
                )
                item.contentInsets = NSDirectionalEdgeInsets(
                    top: 5,
                    leading: 5,
                    bottom: 5,
                    trailing: 5
                )

                let groupSize = NSCollectionLayoutSize(
                    widthDimension: .fractionalWidth(1.0),
                    heightDimension: .absolute(
                        (rectRespectingAspectRatio.height)
                    )
                )
                let group = NSCollectionLayoutGroup.horizontal(
                    layoutSize: groupSize,
                    subitems: [item]
                )
                group.contentInsets = NSDirectionalEdgeInsets(
                    top: 10,
                    leading: 10,
                    bottom: 10,
                    trailing: 10
                )
                return NSCollectionLayoutSection(group: group)
            default:
                return nil
            }
        }
    }
}
To use this layout when displaying the participantsView, replace setupParticipantsView in SpaceViewController.swift with this:
func setupParticipantsView() {
  // We'll calculate the layout by sizing the cells to fit an aspect ratio
  //   see the implementation of `ParticipantLayout.make()` for details.
  participantsView.isHidden = true
  participantsView.setCollectionViewLayout(
          ParticipantLayout.make(),
          animated: false
      )
  self.dataSource = setupParticipantsDataSource()
}5Publish audio and video
Next, we'll access the device's camera and microphone to publish audio and video.
Set up SpaceViewModel to publish tracks
Replace the publishAudio stub in SpaceViewModel.swift with the implemented method in the snippet below.
func publishAudio() {

    /// We'll use the default options to setup
    /// audio capture from the device mic
    let options = AudioCaptureOptions()

    /// Construct an audio track
    let micTrack = space.makeMicrophoneCaptureAudioTrack(
        options: options
    )

    /// Publish the audio track
    space.publishTrack(
        micTrack
    ) { [weak self] (error: AudioTrack.PublishError?) in
        guard error == nil else { return }

        guard let self = self else { return }

        self.publishedAudioTrack = micTrack
    }
}
Replace the publishVideo stub in SpaceViewModel.swift with the implemented method in the snippet below.
func publishVideo() {

    /// We'll use the default options to setup
    /// camera capture from the device's front camera
    let options = CameraCaptureOptions()

    /// Publish the camera track
    let cameraTrack = space.makeCameraCaptureVideoTrack(
        options: options
    )

    /// Publish the video track
    space.publishTrack(
        cameraTrack
    ) { [weak self] (error: VideoTrack.PublishError?) in
        guard error == nil else { return }

        guard let self = self else { return }

        self.publishedVideoTrack = cameraTrack
    }
}
Try building and running the app. Tap on the Join Space button. You should see a video from your front camera appear.
If you have a second device to test with, try building and running the app again on the second device. Both apps will subscribe to the other app's video and it will become visible in the collection view you've created above. Note: when joining with a second app, it is possible to reuse the same JWT if there is no participant ID in JWT payload. For more on this see the JWT Payload and authentication behavior documentation.
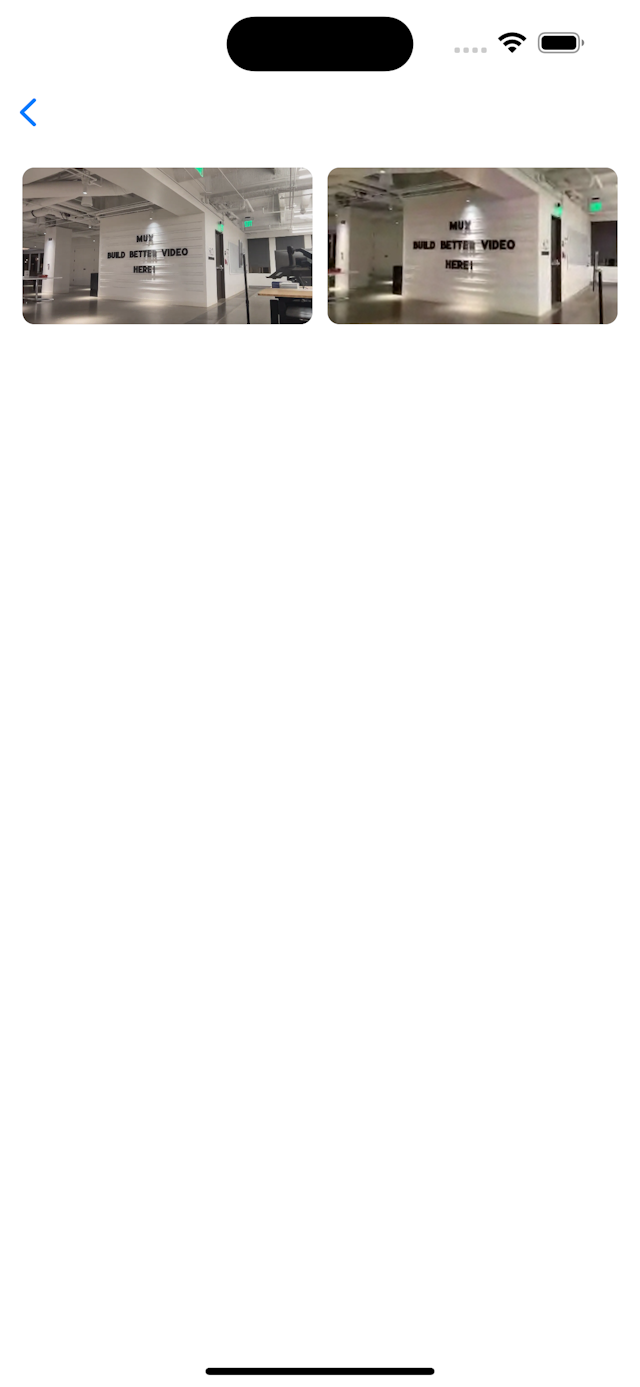
If you're also joining the space using the web SDK from your desktop, video from your desktop camera will become visible in the collection view you've created above. Above is a screenshot of what the layout might look like.