The old version is still available here
Build real-time video experiences
The Mux Video API allows you to build real-time video experiences into your application, including communications spaces and broadcasts to live streams.
In this guide:
1
Get an API access token
Get an API access token
The Mux Video API uses a token key pair that consists of a Token ID and Token Secret for authentication. Generate a new Access Token in the settings of your Mux account dashboard.
2
Get a JWT key-pair
Get a JWT key-pair
Create a signing key-pair for server-side signing of JWTs.
3
Create a space
Create a space
A space is the Mux abstraction for real-time communication. Create a space where participants can share audio, video, and screen-share.
4
Sign a JWT
Sign a JWT
Sign a JWT server-side with your key-pair, so that clients can authenticate to a space.
5
Integrate a Mux Spaces SDK
Integrate a Mux Spaces SDK
Integrate real-time communications into your application using one of the Mux Spaces SDKs for the web, React, Android, or iOS.
1Get an API access token
For a guided example of how to make API Requests from your local environment, see the guide and watch this video tutorial: Make API Requests.
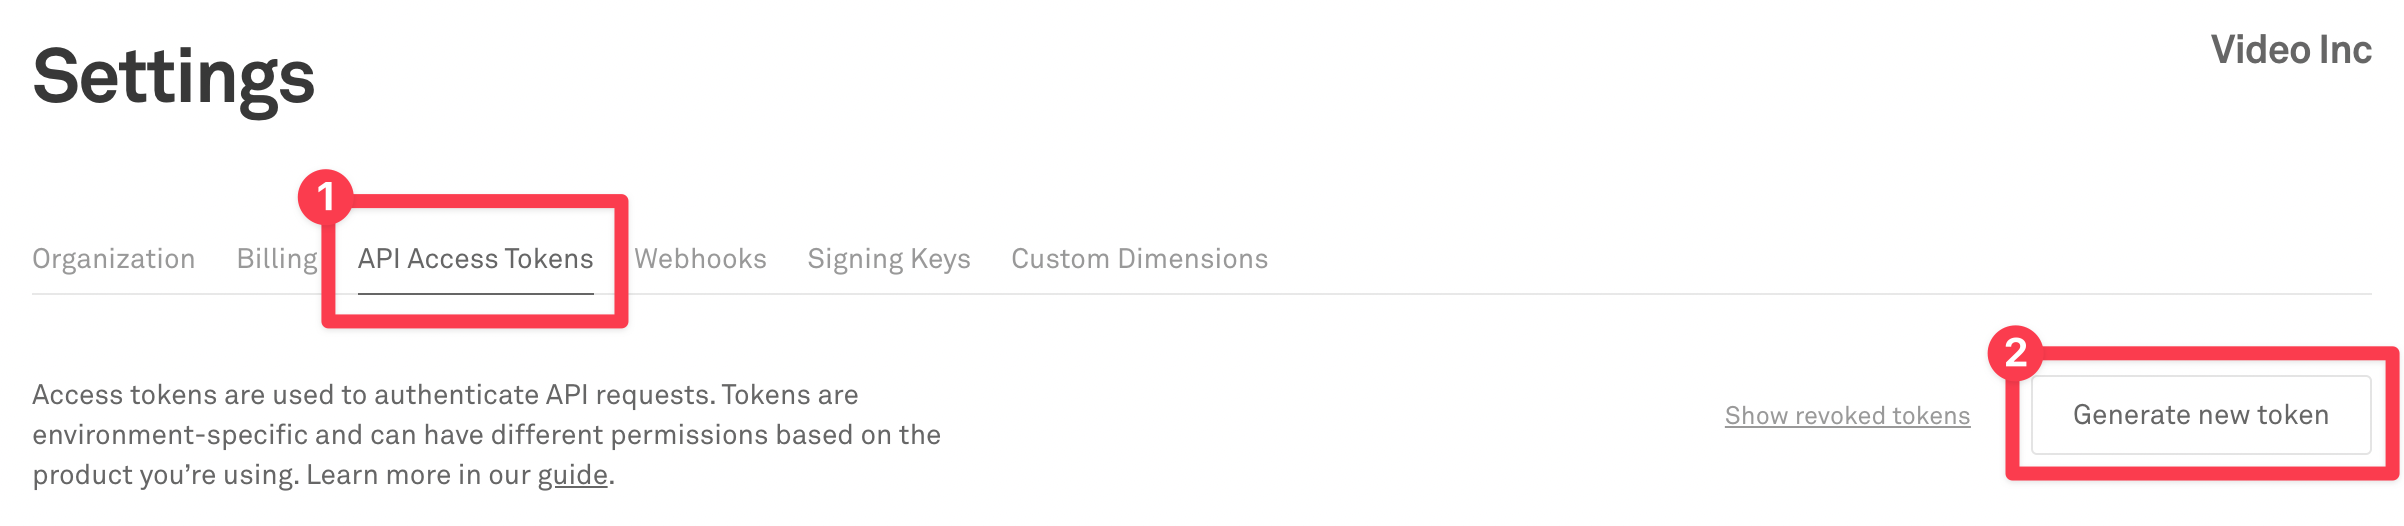
The Mux Video API uses a token key pair that consists of a Token ID and Token Secret for authentication. If you haven't already, generate a new Access Token in the Access Token settings of your Mux account dashboard.
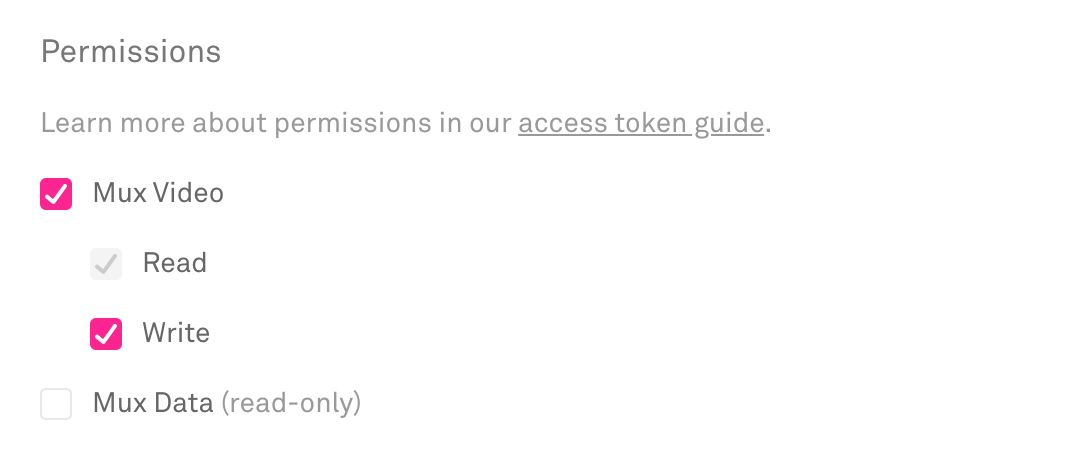
The access token should have Mux Video Read and Write permissions.
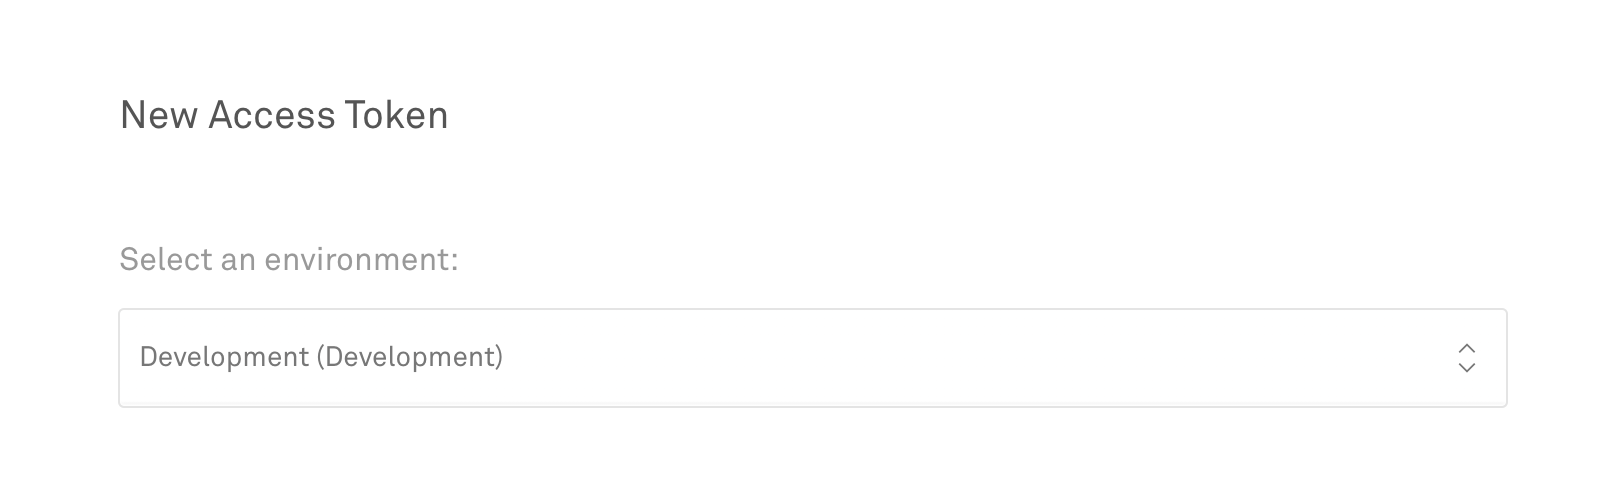
Access Tokens also belong to an Environment. Be sure to use the same Environment when using Mux Video and Mux Data together, so the data from Mux Data can be used to optimize your Mux Video streams.
2Get a JWT key-pair
The basic abstraction for creating real-time communications with Mux is a space. In order for clients to authenticate to a space, they need to provide a signed JSON Web Token, or JWT. This signed JWT is the way that the real-time client authenticates to a particular space.
In order to sign the JWT before sending it to your client, you must create a signing key. Signing keys can be managed (created, deleted, listed) either from the Mux dashboard or via the Mux Video API. When creating a new signing key, the API generates a 2048-bit RSA key-pair and returns the private key and the public key. As the name implies, you should securely store the private key, and never pass it to a real-time communications client. The other portion of the key-pair, the public key, will be stored by Mux in order to validate the signed tokens were actually signed by the private key. As it's name suggests, it's perfectly fine to share your public key if you so desire.
Signing keys are created and deleted independently of assets, spaces, or API tokens. You probably only need one signing key active at a time, but if you so choose you can create multiple key-pairs to enable key rotation. In this case, you would create a new key-pair to sign new JWTs but hold off deleting the old key-pair until after any JWTs signed with that older key-pair have expired.
Signing keys are also used for creating playback restrictions on video assets. See Create a URL signing keyAPI API for additional documentation.
3Create a space
Full API ReferenceAPIAs explained above, a space is the basic level of abstraction for building real-time communications with the Mux API. The first step to building real-time communications into your application is to create a space. You can create a space through the Mux dashboard or via the Mux API. To create a space using the Mux API, simply POST an empty body to the video/v1/spaces endpoint, as shown below. (Don't forget to substitute your actual Mux token ID and token secret for ${MUX_TOKEN_ID} and ${MUX_TOKEN_SECRET}.)
curl https://api.mux.com/video/v1/spaces \
  -H "Content-Type: application/json" \
  -X POST \
  -d '{}' \
  -u ${MUX_TOKEN_ID}:${MUX_TOKEN_SECRET}
You should receive back a response that looks something like the following:
{
  "data": {
    "type": "server",
    "status": "idle",
    "id": "oXvx1ydOr2FLIgnatM00L5hDwIlld2BjVp0rdoxryvkE",
    "created_at": "1653365403"
  }
}
This response will contain information about your new space. Be sure to take note of the id field, as you’ll need this space identifier for the rest of the real-time guides. We’ll refer to this ID in the following guides as ${SPACE_ID}.
4Sign a JWT
As explained above, client authentication to a space is controlled by using a signed JWT. You can use an existing signing key from your Mux account to sign a JWT for a real-time space.
The workflow for signing a JWT typically goes like this:
- A JWT is created with an expiration in the future. See the section below on how to create a JWT.
- The JWT is signed on the server using a signing key. The signing key used to sign the JWT and the space ID specified in the JWT must be from the same Mux account and environment.
- The signed JWT is passed to the client.
- The client uses the signed JWT to authenticate to the Mux Spaces API when joining a space.
If you want to quickly generate a one-off JWT for testing, you might want to try the mux-cli, and use the spaces:sign command to quickly get a JWT.
JWT Payload and authentication behavior
Access to a space is controlled by a JWT, which is passed in as the only parameter to the SDK when you want to join a space.
The signing keys for this JWT are the same ones that are used today to sign Video URLs. Signing keys are un-scoped and all existing signing keys are valid for spaces.
The layout of a JWT is a simple JSON object with a few fields. Here's an example JWT for accessing a space:
{
  // The ID of the space
  "sub": "${SPACE_ID}",

  // Set the audience to "rt" for real-time
  "aud": "rt",

  // Put your signing key ID here
  "kid": "${SIGNING_KEY_ID}",

  // The expiration date in the future, in epoch format
  "exp": 1680602773,

  // One of "publisher", "subscriber"
  // This is optional, defaults to "publisher"
  "role": "publisher",

  // Optional external Participant ID - See below
  "participant_id": "MY_CUSTOM_ID"
}
The expiration in the exp field must be in the future. Please note that once the JWT expires, the client will no longer be able to authenticate to the Mux Spaces SDK with that JWT.
What's the deal with participant_id, I hear you ask? The participant_id is an optional ID that you provide to identify a participant within a space. The Mux Spaces SDKs will also represent each participant with a connection_id. The SDKs will expose both of these IDs so that you can choose to use whichever identifier you choose.
While the connection_ids will always change when a participant reconnects, the participant_id will remain the same if you specify this optional ID.
Participant Enforcement
If a participant_id is not provided in the JWT, the Mux Space API will auto-generate an participant ID. Using the same JWT multiple times is allowed if there's no participant_id specified.
User-provided participant_ids can be used to optionally enforce participant uniqueness in a space. If participant_id is provided in the JWT, and a client joins a space with that JWT, the Mux Spaces API will check to see if there is already a participant with that particular ID, and if so, it will reject the new connection.
This hybrid approach enables you as the developer to pick between strong access control and more fluid use cases where granular access control is not as important.
Signing the JWT
The next step is to use your signing key to sign the JWT. There are JWT-signing libraries available in most if not all of the major programming languages. Just remember to put your signing key and an appropriate expiration in the JWT itself, and sign the signing key that matches your signing key ID.
You should only sign a JWT on the server, where you can keep your signing key secret. You should not put your signing key in the client itself.
package main

import (
    "encoding/base64"
    "fmt"
    "log"
    "time"

    "github.com/golang-jwt/jwt/v4"
)

func main() {

    spaceId := "" // Enter your space ID here
    keyId   := "" // Enter your signing key ID here
    key     := "" // Enter your base64 encoded private key here

    decodedKey, err := base64.StdEncoding.DecodeString(key)
    if err != nil {
        log.Fatalf("Could not base64 decode private key: %v", err)
    }

    signKey, err := jwt.ParseRSAPrivateKeyFromPEM(decodedKey)
    if err != nil {
        log.Fatalf("Could not parse RSA private key: %v", err)
    }

    token := jwt.NewWithClaims(jwt.SigningMethodRS256, jwt.MapClaims{
        "sub": spaceId,
        "aud": "rt",
        "kid": keyId,
        "exp": time.Now().Add(time.Minute * 86400).Unix(),
        "role": "publisher",
    })

    tokenString, err := token.SignedString(signKey)
    if err != nil {
        log.Fatalf("Could not generate token: %v", err)
    }

    fmt.Println(tokenString)
}
Once the JWT has been signed, the signed JWT can be safely passed to the client. The client will then use the signed JWT to authenticate to the Mux Spaces API.
5Integrate a Mux Spaces SDK
Once you've gone through these steps, you're ready to integrate real-time communications in to your application by following one of the following guides:
- Send and receive real-time video from a web application
- Send and receive real-time video from a React application
- Send and receive real-time video from an Android application
- Send and receive real-time video from an iOS application